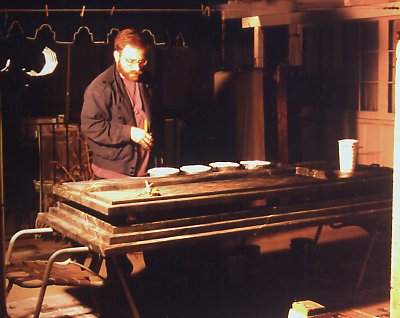
 Grave Slab (1999)
It was decided that an interesting feature in the Profane section of the graveyard would be an open tomb. The style selected was a full Ledger Stone. This type of grave marker was usually installed over a standard burial to provide protection for the grave and space for decoration and text. Sometimes such a stone was actually the cover for a burial vault. It is this form that allowed for the most interesting scene.
The concept was that the vault cover had been dislodged and an occupant was trying to get out. Visitors could see nothing inside but a black void. Occasionally the cover sould slide from side to side as though being pushed from within. The sound of groaning and sliding stone accompanied the movement.
 Repainting the Grave Slab (1996)
In 1994 the prop was built of layers of 3/4" plywood and 2x4 lumber framing. This construction provided substantial mass to emulate stone embedded in the grass.
It was painted with standard theatrical scenic marble techniques. Gray primer and base coats were then blotched with four shades of gray, wet blended, rag rolled and then veined. The result was a pretty convincing representation of a marble slab, particularly under the low, oblique lighting conditions in the scene. (The images on these pages are all a bit brightly, even fancifully, illuminated to show detail. In reality the scene was quite dark.)
When the slab was placed in the scene the grass within was covered with black duvytene to absorb light and give the illusion of depth.
After the slab was finished it was time to animate the lid. Due to the construction, the lid was very heavy and we did not have time to get the proper materials before the show, so in 1994 it was a static prop. By 1995 we had the time and materials we needed to make it work. The idea was that the top of the lid would slide when the sound of sliding stone was heard from within. Because of the weight of the lid, we needed to make it as easy to move as possible. The foot end of the lid pivoted on a steel stud protruding from the frame. It was supported on a stack of steel and nylon washers. A furniture glide was attached to prevent the lid from tilting and rubbing on the frame. The head end of the lid was supported on two rubber rollers to reduce friction and add stability.
Hydraulics would be a preferred actuation method, but we were not using hydraulics anywhere and the cost in time and materials would have been prohibitive. Pneumatics might have been a good choice, with a simple cylinder well suiting the motion desired. Unfortunately, we never used compressed air anywhere in the show either. An electric linear-actuator would have been ideal, but that would require an expensive device that we did not have, and a reversing controller as well.
 Animating the Grave Slab
Our usual method of animation was electric gear-motors, and that is what we applied here. Although not the most "realistic" motion, connecting a regular gear-motor to a bell-crank and then through a push-rod to the lid would yield an oscillating motion.
In a search of the usual surplus outlets we located a 1/15hp universal (AC/DC) right-angle gear-head motor. This type of motor is typically used for sewing machines and similar applications. It has the advantage of speed that varies with voltage and thus can be controlled with a regular motor speed controller.
Once we had a motor, we needed to install it in the frame and connect it to the lid. The frame side was simple, just needing some blocking installed to which we could attach the motor wih lag bolts. The lid side was more complicated. A "bell-crank" would work, but those are a specialty item that is not available in our local hardware store or home center. What was available, in a size able to connect to the motor shaft, was a V-belt pulley. A hole was drilled through one of the spokes and a 1/4" bolt inserted. The lid had a "hanger bolt" attachment. A hanger bolt is a stud that is a standard bolt thread on one end and a lag bolt thread on the other.
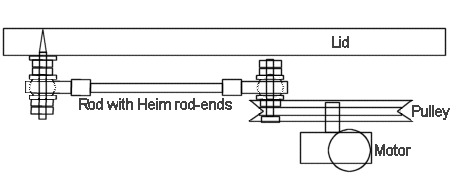 Lid mechanism, side view
A threaded rod connected the lid stud to the motor crank. Because there was no means to properly align the two attachments, a "Heim" or ball-joint rod end was used on each end. This type of attachment allows for slightly misaligned connections to be made without binding.
Once the motor was installed, it needed to be powered. A ceiling-fan speed controler was added to slow down the motor a much as possible without stalling. A greater gear ratio would have been helpful, but with surplus motors one cannot be too selective.
The motor then needed to be triggered by a sound-activated relay. A previous trip to the surplus store had provided some circuit boards, with microphone, from a device that toggled on and off at the sound of, perhaps, a "clap." We were able to modify the circuit to come on at a sound but turn back off shortly after the sound was gone. This board was connected to a relay that powered the motor. We will not go into detail about the circuit because the parts are probably no longer available, the modifications were not documented and there are probably much more effective methods. It was essentially a single-channel color organ driving a relay that powered the motor.
The power supply for the board, the board, the relay, and the motor speed controller were all placed in a plastic bag to help protect it from the weather. Had we realized just how long we were going to use this system a more permanent enclosure would have been made. As it was often the case, it seemed easier to just keep doing the same thing evey year.
 Flash photo of the slab (2004)
A small portable tape player containing an endless-loop cassette was placed under the lid. The microphone from the motor circuit was placed near the speaker. The sounds of stone grinding and creature moaning would trigger the motor to move the lid back and forth. Eventually, when the technology cost came down, the cassette player was replaced by a compact disk player.
Ambient show sounds helped to cover the sound of the motor. If it was a quieter scene, more sound suppression or another actuation method might have been needed.
In the end this was a pretty effective prop for the intended purpose. It was close to the audience and would operate from the earliest moments, supporting the ambiance even before the full show was open for visitors.
 To Grave Slab